Showing posts with label Eliot School. Show all posts

Thursday, April 7, 2011

Upholstery Class 8.9.10.

Oh haiiiiiiii. How are you? Welcome back. You look great.

So, I figured I should wrap up this upholstery class series. And. Wait for it. The chair is not finished. Gasp. I know. I'm super bummed. How will I ever finish without a pro to practically do half of the chair for me? What happened? How could I not finish? Well, there are a couple of reasons. One is that I skipped a class. Class 8. Stupid. I know. It was the day after our marathon moving adventure that ended at 3 am and I was pooped. But I probably wouldn't have finished anyway, the other reason being that all I have to do is look at a sewing machine and it either breaks or the bobbin is empty. Empty bobbin? Wha? I did not even know how to refill a bobbin. I do now. I think. Uhhhhhh. Me thinks I need some practice.

Anyway. Here's what I did get done.


Got the arms all padded up.

Cut the front of the arms out.

Learned how to sew welting and attached the welting to the arm fronts. Broke the sewing machine like five times.

Cut the fabric to cover the arms and then sewed the arm fronts onto the arm fabric.

Stuffed some cotton in the arm fronts and then tacked everything down tight.

Filled in any bumpy spots on the arm fronts then pulled it all tight and stapled it tight. Trimmed the extra fabric off.

Time to pad the back.
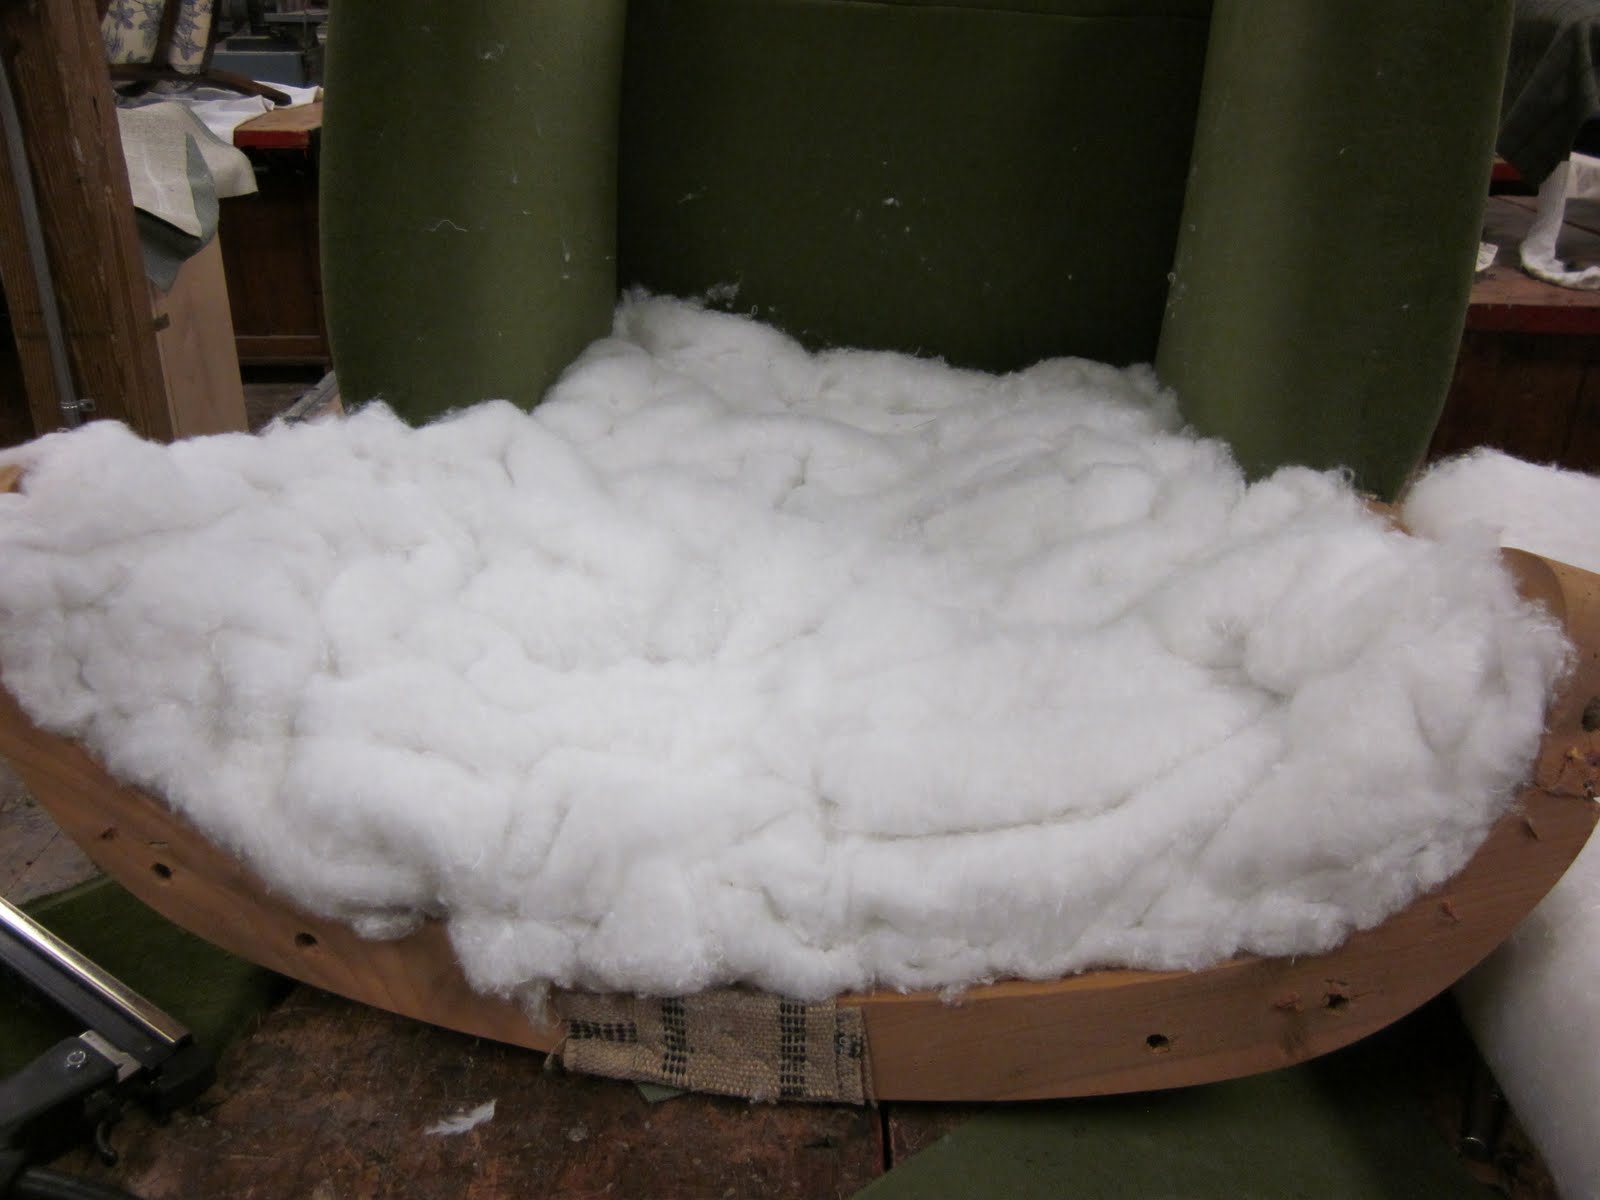
Step 1: essentially crumple extra cotton to cover back. This is a dense cotton layer. No holes. No high spots. Maybe crumple is the wrong way to describe it. Accordion fold? Yes, do that.

Then cover that layer with two flat layers of cotton. Staple the edges down along the top and sides.

Cut dow
n a piece of foam and mark the top center. The top center of the foam should line up with the top center of the chair.

Staple the foam around the cotton along the very inside edge along the top and sides. Tight tight tight. Then trim around the arms and tuck in.

And that's as far as I got. Lame, no? Although, I have been noticing a trend in unfinished looking upholstery...so maybe? No? Yeah, I don't think so either. Oh, and I think I will stop calling it the Christmas chair because I found this. And I love love the way that little love seat looks, so this could turn out well. I think.

Friday, March 18, 2011

Upholstery Class #7

So this is where I left off at the end of class #6. Stuffed and squishy.

Everything stapled down tight.

After waiting until the complete last minute (of course), I finally picked out a fabric. I'll be honest. I'm not completely sold. Here's how it went down. I wanted velvet. I don't know why, I just did. But I wanted navy velvet. Probably because I adore this couch (third pic down). Yes, I know that is a totally different style than my chair, but I love it. Maybe I will just recover this chair in the perfect navy velvet and we can have a velvet party at the Dog House? Who's in?
Ok. Back to the point. I didn't find a navy velvet in person, that I could touch, to make sure it was the perfect softness and awesomeness. What I did find was one grey velvet of perfect softness and one green velvet that we thought was both fun and classic at the same time. So I did what any normal indecisive person would do. I took a vote. Friends, family and P all voted for what I am now lovingly calling either "the pickle fabric" or "the christmas fabric". Meanwhile, in my head I'm thinking, "but grey, that's super neutral. yeah. neutral is good. grey is safe. yeah. let's do grey. oh, but i do like the pickle green. there is something really fun and nice about the pickle green. ahhhhhhhh. i can't decide.".
Life is good when your main struggle at the moment is a fabric choice.
So, I set off to the fabric store, still going back and forth in my head. I arrived at the fabric store (in the middle of NOWHERE, no, just kidding, it's in Lynn, MA, same thing) with, no joke, like 10 minutes before they closed. Awesome. Did I mention I'm also wearing an amazingly dirty little outfit from working on the house all day? Awesome. Oh, I'm getting off topic again. Ok, fabric. So, I rush back to velvet land, where alllll types of velvet live, except the perfect navy velvet, but I'm not dwelling. Long story short. I close the place down while I stand in the back of Zimman's staring at my two selections...while a very patient salesman stares at me. In the end, it was a gut decision. I went outside of my comfort zone and went with crazy Christmastime. I'm not all that happy with my gut today, but we will see.
So, after all that rambling. Here it is.

Pickles and Christmas. Hmmmm. Is it weird that that kind of makes me hungry?

Class #7 essentially consisted with cutting into the pickle fabric and heading into the sewing area where I proceeded to have a wresting match with an ancient sewing machine. It won.
I switched to a newer machine, and I won. I sewed (most of) this bottom piece. And, as is becoming tradition, didn't get a final picture of it all stuffed and stapled down. But it is, stuffed and stapled down.


Mmmmmm. Christmas.

Tuesday, March 8, 2011

Upholstery Class #6

I somehow managed to only get three pictures from last class. So lame. But then I was looking at them, and it appears that maybe I only got three pictures because I barely accomplished anything. Awesome.
What I did manage to do is pad the arms. To do this you cut two pieces of cotton. Put the first on the inner arm as seen below, tuck in and staple to attach. Then you cut a larger piece to go from the outer arm all the way to cover the first piece and tuck in again. Staple staple staple.

Now you have two furry cotton arms.

Then you cut two pieces of 1" foam to cover the arms just like the second sheet of cotton...except it overhangs 1 or 2" on front, back side and bottom. Staple the side first, then tuck in the bottom and staple the front down.

You know what? Now that I think about it...I totally put muslin over the foam too. And sanded the legs a little. So I'm not totally worthless. I'll get a picture of that in class #7. Class #7! It's not looking good for finishing by class #10. Booooo. But, on the bright side, the teacher did say that I NEED to bring fabric for class #7.
So I bought some.
I will give you a hint what it looks like...pickles.

Friday, February 25, 2011

Upholstery Class #5

Warning, photo overload.
I'm trying to document this all step by step as best I can. You know, so I can hopefully do it again one day and stuff. But there is soooo many steps. Hence the photo overload.
Anyway.
Fold the burlap over the arm, so it's not hanging out all scraggly.


Ooooops. Backtrack a bit. After a closer inspection the teacher has decided that the front roll is too low. It should be almost even with the highest part of the springs. Take it off and cut a strip of wood to nail underneath it.

Also, staple a piece of burlap over remaining holes along the side of the back. (Burlap is typically used so that cotton stays in place.)

Ok, now nail the wood strip and roll back in place and make a side roll for each side out of burlap and cotton. This creates a trough with the front and side rolls creating three sides and the springs creating the back side. Then stuff the trough with cotton so that it is flat from the front roll back to the springs.

Stuffed.

Then stuff the sides around the seat springs with cotton until the seat is flat.

The put two layers off cotton overlapping each other across the front and wrapping around the sides. Then pull the muslin, that is whip stitched to the seat, down tight and smooth and temporarily tack it in place across the front. This part has to be pretty, padded and smooth, because it is a visible section of the re-upholstery.

Cut a piece of 1" foam so that it overlaps under the sides and back by 1" on each side, then cover the whole seat with cotton. (Obviously missed a pic of this step) Then snip the muslin around the rails of the arms and pull it down through the back and sides, tight. Temporarily tack in place on the back first, then the sides.

Temporary tacks all around the sides.

And the back.

Then you go back to the front and remove the tacks. Pull everything down starting at the center, smooth and tight, and staple underneath. As I mentioned, the front part is visible, so the staples go underneath and the muslin is snipped and folded under neatly around each leg. Next, move to the back and pull the muslin tight and staple across the back, moving from the center to the sides. Staple the muslin in a straight line down from each arm stile, from this point back is not visible, so there is no cotton and the staples exist on the side and not underneath. Confused yet? I think I'm confusing myself.
ps. Who wants to buy me one of those sweet staple guns?

Squishy, smooth and pretty.

So I'm officially halfway through the class. Did I mention he told me I probably wouldn't finish it all in one session? And that I'm determined to come as close as possible? Must. Move. Faster!

Wednesday, February 23, 2011

Upholstery Class #4

Week #4 left me feeling a little slow and unproductive. I'm hoping that it's just the waiting part that comes after I've finished a task and the teacher hasn't made it back to me yet...and not actually that I'm a slow poke.

I covered the inside back, sides and seat springs with burlap.

Next I stuffed the arms with cotton. I thought I had done it right and the teacher came over and laughed. Apparently you are supposed to really stuff it. I only had 1/4 of what was necessary. He said you want to stuff it until it's hard, this provides the base for the arm so that you never feel the wood when you rest your arm on the arm rest.

So then I really stuffed it. And stapled it down.

Finally I got to whip out the muslin and have my first turn on the sewing machine. The teacher did the first couple of passes and made it look sooooo easy. Then I got on the machine...and looked like a complete dummy. But, I finished it, without breaking the machine. Did I mention that this wasn't even my first time sewing? Total dummy. I think I need some practice.
Once the muslin cover is sewed you put it in place over the seat and whip stitch it down through the coils. Whip stitch? I think that's the right term. You use curved needles.

So I didn't finish stitching it down. Here's hoping tonight's class will be more productive!

Monday, February 14, 2011

Upholstery Class #3

Springs! After a week off of class due to snow storm #4529 this winter, I spent session #3 of upholstery class attaching the new seat springs. Weather must be warming up, because this is the first week I think that all of the class members showed up. Packed house. The poor instructor was running in circles for the whole three hours, luckily he was able to explain each step and then I could work on it as he made the rounds to other students and then I would be ready for the next step by the time he returned. Not too much standing there looking confused, so that was good.

Step 1: Space the six springs out equally on the bottom webbing, making sure that they are not close enough to touch each other.


Step 2: Use “the clincher” to staple down the springs. (I tried to find a picture of this online and only managed to possibly open a site with a potential virus...but I think this is what he called it)


Step 3: Hammer in tacks in sets of 2, one set to line up with each row of springs and then another set to be in between the rows for the diagonal bracing. Repeat for the front, back and both sides. (Confusing? You will see what I mean)


Step 4: Cut one piece of Italian Ruby Twine to a specific measured length (this will differ for the chair you are working on) for each nail set along the back and one side. Loop the twine over the tacks like Mickey Mouse ears.


Step 5: Starting from the back, tie down the three rows of springs. This involves a method of looping over the correct part of each spring and tying a knot and then pulling the springs tight tight tight. I couldn't even pull them tight enough. Teach had to do it for me. I'm a wuss. Once they are tight you spiral the twine towards the back and knot it again.


Step 6: Repeat the same thing going from side to side, only this time you don't have to pull the springs tight, because they already are.


Step 7: Repeat the same thing with those middle strings, this time going across the diagonals.


Step 8: Knot down all the loose strings. Then pull some cotton off of your huge roll of cotton that teach told you was required and stuff chunks of it under the last coil of each spring. This is one of those “insider tips” from the teach, it is supposed to stop the drum sound that springs can sometimes make each time you sit down. I like insider tips.


There you have it! A poorly explained step by step of class numero tres. Something tells me my future isn't in “how-to books”?

Still fabric shopping. Made a visit to IKEA over the weekend and wasn't all that thrilled with the fabric selection there, so I'll keep hunting. Can't wait until class #4!

Thursday, January 27, 2011

The Eliot School: Upholstery Class

I've been wanting to learn how to reupholster furniture for a long time now. Anyone who visited my college apartment might remember a sadly unsuccessful attempt at a gray chair in my living room. After reading about The Eliot School on Apartment Therapy I finally decided to sign up for a class.
The school is located in Jamaica Plain in this adorable old school house.

Class started last Wednesday, so I officially have two sessions under my belt. So far, I'm absolutely loving it. The teacher is great and has worked in the business for years, so I feel like my free chair found on the curb in South Boston is in good hands.
At the beginning of the first class I pulled out my camera to snap a before picture...and this is what I got.

No good, right? It appears that P's point and shoot is on strike. I attempted to continue the documentation with my iPhone, but sorry if the pictures aren't great...or focused at all. I'm awful at taking pics with the iPhone...how do some people make them look great? Anyway...here is the "before" picture. P spotted this down the street from our house some time last year and after a careful inspection for you know what we carried it home. And then I reinspected it again and again...and then I hoarded it away in our storage unit. Hoarding is ok if you have a storage unit, right? Right?!? Ok....

When I walked in the door the instructor informed me that it might take multiple sessions to do a fan chair, so I didn't waste any time getting all the gross old fabric, cotton and foam stripped off.

Everything was so old that it all will have to be replaced, including the springs that you sit on! So, at the end of class one I was left with a wooden frame, which we checked for sturdiness and then glued and clamped any wobbly parts. My iPhone missed a picture of that step, my bad.
During class two I removed any remaining staples and tacks in the frame left over from the old upholstery. Then I started rebuilding! So exciting. The first step was to turn the chair upside down and redo the webbing for the seat.

All the pieces are attached from front to back, then you weave in the pieces from side to side...pulling everything tight tight tight with one of these.

Then the webbing is attached to the arms. This is just to form the surface for the cotton to attach to, so it doesn't need to be as tight.

Then repeat for the back of the chair.

That's as far as I got in class two. It seriously has been so fun so far...and I can't wait to pick fabrics. Apparently that won't happen for a while, but I may or may not already have a couple of swatches I've been carrying around!

PS. If anyone has any recommendations for a good, small, point and shoot camera, let me know! I think I know which one I want, but would love to see what you think.