skip to main |
skip to sidebar
I've been wanting to learn how to reupholster furniture for a long time now. Anyone who visited my college apartment might remember a sadly unsuccessful attempt at a gray chair in my living room. After reading about The Eliot School on Apartment Therapy I finally decided to sign up for a class.
The school is located in Jamaica Plain in this adorable old school house.
 Class started last Wednesday, so I officially have two sessions under my belt. So far, I'm absolutely loving it. The teacher is great and has worked in the business for years, so I feel like my free chair found on the curb in South Boston is in good hands.
At the beginning of the first class I pulled out my camera to snap a before picture...and this is what I got.
 No good, right? It appears that P's point and shoot is on strike. I attempted to continue the documentation with my iPhone, but sorry if the pictures aren't great...or focused at all. I'm awful at taking pics with the iPhone...how do some people make them look great? Anyway...here is the "before" picture. P spotted this down the street from our house some time last year and after a careful inspection for you know what we carried it home. And then I reinspected it again and again...and then I hoarded it away in our storage unit. Hoarding is ok if you have a storage unit, right? Right?!? Ok....
 When I walked in the door the instructor informed me that it might take multiple sessions to do a fan chair, so I didn't waste any time getting all the gross old fabric, cotton and foam stripped off.
 Everything was so old that it all will have to be replaced, including the springs that you sit on! So, at the end of class one I was left with a wooden frame, which we checked for sturdiness and then glued and clamped any wobbly parts. My iPhone missed a picture of that step, my bad.
During class two I removed any remaining staples and tacks in the frame left over from the old upholstery. Then I started rebuilding! So exciting. The first step was to turn the chair upside down and redo the webbing for the seat.
 All the pieces are attached from front to back, then you weave in the pieces from side to side...pulling everything tight tight tight with one of these.
 Then the webbing is attached to the arms. This is just to form the surface for the cotton to attach to, so it doesn't need to be as tight.
 Then repeat for the back of the chair.
 That's as far as I got in class two. It seriously has been so fun so far...and I can't wait to pick fabrics. Apparently that won't happen for a while, but I may or may not already have a couple of swatches I've been carrying around!
PS. If anyone has any recommendations for a good, small, point and shoot camera, let me know! I think I know which one I want, but would love to see what you think.
 Stand by the amazing heater our awesome contractor let us borrow. This thing doesn't mess around and it could heat a house larger than ours. This, combined with insulated Carhartt overalls sent by a super awesome friend, has kept me happy and warm, in a house with no real heat. Still.
One night a couple of weeks ago, much to our plumber's dismay, I took the second chimney down. You see, he conveniently forgot our little conversation about how we would like to direct vent the boiler rather than it running up a useless crumbling chimney through our house. He is now convinced that we are evil people who "change things all the time"...but that's another story.
Anyway, back to the chimney. After over a year I've discovered that this is the area in which I excel. Destroying things. The rebuilding process has often left me confused or frustrated (aka: whimpering and whining about why that piece of wood is not the length I cut it, or sniffling about the water that won't stop dribbling through my roof). But taking things down...mindless, easy, sometimes even relaxing.
Of course I probably only say this about the chimney because, well, it was super easy to take down. Something about the combination of old old old bricks and water getting into the chimney over time made them come down like unstacking legos. Well, I did have to tap each brick like once or twice and then remove it...but that sure beats having to use a chisel, which is what my research led me to believe I would have to do. But I didn't, so ha.
 As usual I stirred up an amazing dust cloud before remembering to take the first picture.
This is upstairs as the removal is just starting. Upstairs chimney removal complete.
 Downstairs before removal.
 Starting to take it down.
 Getting closer.What happened next, I can only guess is that I collapsed in a heap and passed out after forgetting to take an after shot. Oh, and do you like our collection of PVC? Apparently, upon delivery of the PVC the plumber is then granted a two week break before any actual work begins. Hmmm, two sarcastic, scathing comments about the plumber in one post? Might be a sign of stories to come.
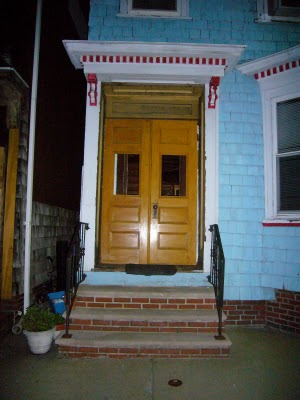
Eventually, one day, we would like for our house to make a good first impression. Right now, it says "Ew, good thing no one lives there". If you will recall, the house looked like this when we bought it. We did a bit of demo and removed the storm door and surrounding frame and then propped our new old double doors in place.
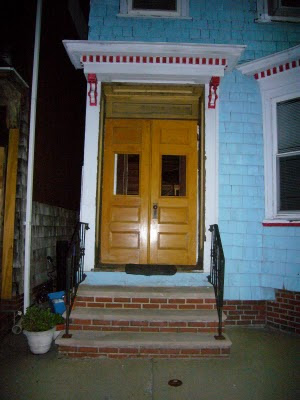 We are finally moving forward towards what we consider the first real improvement to the front of the house and plan to have the doors installed soon. Before they go in there are a few decisions to be made. Things we, of course, have been thinking about for months and months. So, similar to past moments of indecision, we are hoping someone out there might weigh in. Help us out. Pick one already! This is what we've got.
Hardware? I think we have narrowed it down to these two single cylinder mortise locks. The finish is oil rubbed bronze, which to my understanding should age over time. The differences between the two are thrilling, I know, but that's what we've got. #1 Baltimore. #2 Reading.

 Ok, I admit it. The decision is not that easy. You see, we have been planning to sand these doors down and stain them. It seems this could be quite a difficult undertaking. When the new hardware is installed it will actually need to be raised slightly so that bending down to open the door will not be required. That's only a mild exaggeration, it's pretty low. So, to do this, the old mortise hole will be filled in and the new one moved up. Apparently making the patch look good enough to stain nicely is a job for a skilled cabinet maker. Which we are not. Yet. Ha. Then on top of that, apparently the application of marine varnish can be tricky. Sooooo, do we just paint the door? Or maybe paint the outside and stain the inside?
Other things to factor in would be that we plan to do the landing in mahogany similar to this:
 And as of today the plan is to reside the house using Hardieplank, in this color:
 The trim color is TBD.
So, if we paint the door, what color do we go with? And yes, I do realize I'm not giving any options...because I have no clue. I guess a trip for some swatches is in order? Still. Help! Blue? Red? Green? Yellow?